How do I replace a pipetting head?
The Microlab Prep’s pipetting heads can be replaced if they lose accuracy or functionality. This article describes the required tools and materials for pipetting head (or multi-probe head) replacement, in addition to the replacement procedure itself.
Requirements
- Purchased from Hamilton:
- Replacement front pipetting head, rear pipetting head, or multi-probe head
- Tips
- Included with the Prep:
- 2 mm hex wrench (for removing front/rear pipetting head)
- 3 mm hex wrench (for removing multi-probe head)
- You will need to supply:
- Protective gloves (and other appropriate PPE for your lab)
Procedure
-
Version 2.0 or newer
The Prep includes an animation describing how to replace a pipetting head or multi-probe head. The tutorial animations are in the Tutorials tab of the Prep’s settings page.
- Make sure to wear appropriate PPE for your lab.
- Make sure the Prep is turned off and disconnected from power.
- Open the door and clear any labware from the deck.
- Make sure you know which pipetting head to replace. Do not attach a front pipetting head to the rear channel, or vice versa. Hardware errors will occur if the wrong pipetting head is installed.
The steps differ here depending on whether you are replacing a pipetting head or a multi-probe head.
Pipetting Head Replacement
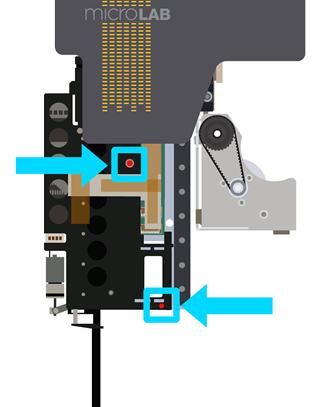
- Pull channels to the front of the instrument and move pipette heads to the bottom of their travel. Two red screws will become visible for independent pipette heads.
- Remove the two red screws on the pipetting head. The Prep comes with a set of hex wrenches; use the 2 mm wrench for these screws.
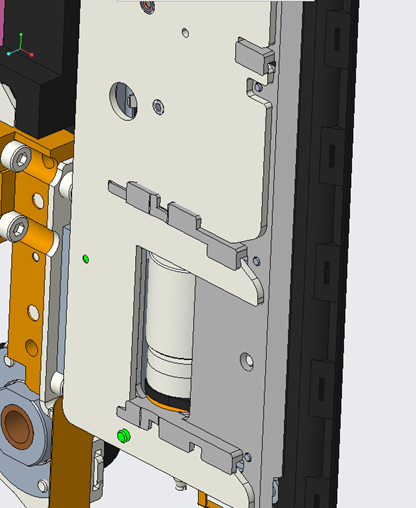
- Examine the back of the channel before proceeding to see how the slots and tabs fit on a correctly installed pipetting head. A pipetting head may "fit" without each of the four tabs lining up properly, which can cause errors later.
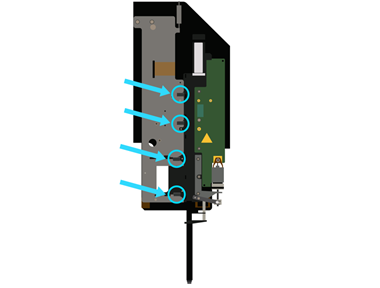
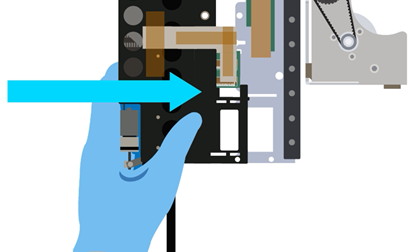
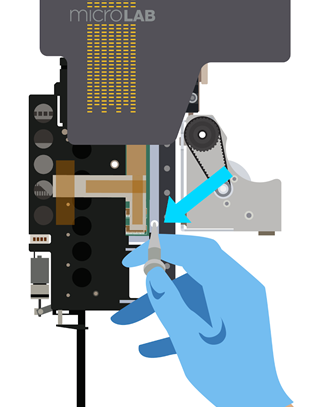
- Pull the pipetting head to the left to fully remove it. Pay attention to how the plastic slots on the old pipetting head match up to the metal prongs on the channel for the next step. Note that pulling the head off the channel may require some force; avoid grabbing the motor or printed circuit board (PCB) when performing this action.
- Attach the new pipetting head. Match the four plastic slots on the pipetting head to the metal tabs on the channel, then slide the pipetting head onto the channel until it clicks in place.
- Secure the new pipetting head with the two red screws from step 1. Replacement pipetting heads come with extra screws if needed.
- Close the door.
- Turn on the Prep and sign in, if required. The new pipetting head must be calibrated using the replacement maintenance routine before it can be used.
- Open the Maintenance Routines page. Tap the settings button at the top-right corner of the home page, open the Maintenance tab, then select Maintenance Routines.
- Select the "Replace a pipetting head" routine and tap Run.
- When prompted, select which pipetting head you replaced and confirm your selection. Tap the front pipetting head or the rear pipetting head (or multi-probe head) onscreen to select it. The Prep will begin calibrating the new pipetting head.
- When prompted, open the door and place tips on site 7. If your Prep has channels only, you will need two tips in positions A1 and B1. Otherwise, you will need a full column of tips in column A.
Specify which tips you loaded onscreen, then tap Next. - Close the door and wait until calibration is finished. You can remove the tips once calibration is finished.
- Pack up the old pipetting head using the materials from the replacement pipetting head, apply the provided label, and return it to Hamilton.
Multi-Probe Head Replacement
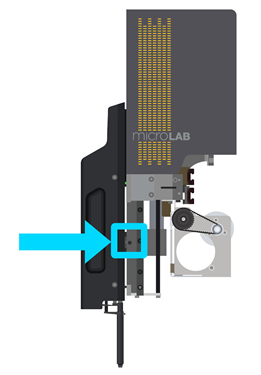
- Move the multi-probe pipetting head down to the bottom of its travel. A dark set screw will become visible. Note that pulling down the multi-probe head may require some force.
- Loosen the indicated screw on the multi-probe head. Use the 3 mm hex wrench to loosen the screw by a half-turn.
- Grab the multi-probe head by the grip and pull to the left to remove it.
- Attach the new multi-probe head. Match the black prong on the multi-probe head to the hole on the channel, then slide the multi-probe head onto the channel until it clicks in place.
- Double-check the alignment of the new multi-probe head. All eight channels should be level. You can push the 8 MPH to the back of the pipetting arm to visually check the alignment using the back edge of the Prep.
- Secure the new multi-probe head by re-tightening the screw from step 1.
- Close the door.
- Turn on the Prep and sign in, if required. The new multi-probe head must be calibrated using the replacement maintenance routine before it can be used.
- Open the Maintenance Routines page. Tap the settings button at the top-right corner of the home page, open the Maintenance tab, then select Maintenance Routines.
- Select the "Replace a pipetting head" routine and tap Run.
- When prompted, select the multi-probe head and confirm your selection. Tap the multi-probe head onscreen to select it. The Prep will begin calibrating the new multi-probe head.
- When prompted, open the door and place tips on site 7. You need a full column of tips in column A.
Specify which tips you loaded onscreen, then tap Next. - Close the door and wait until calibration is finished. You can remove the tips once calibration is finished.
- Pack up the old multi-probe head using the materials from the replacement multi-probe head, apply the provided label, and return it to Hamilton.
-
Version 1.0
The Prep includes an animation describing how to replace a pipetting head or multi-probe head. The tutorial animations are in the Tutorials tab of the Prep’s settings page.
- Make sure to wear appropriate PPE for your lab.
- Turn on the Prep if it is not already on. Sign in if required.
- Tap the settings button with the gear icon at the top-right corner of the home page.
- Open the Instrument tab and select Maintenance.
- Select “Replace a pipetting head” and tap Run.
- Clear any labware from the deck, then close the door.
- Select which pipetting head to replace onscreen. The Prep will position the selected channel or the 8 MPH.
Do not attach a front pipetting head to the rear channel, or vice versa. Hardware errors will occur if the wrong pipetting head is installed. - Open the door when prompted. The steps differ here depending on whether you are replacing a pipetting head or a multi-probe head.
Pipetting Head Replacement
- Remove the two red screws on the pipetting head. The Prep comes with a set of hex wrenches; use the 2 mm wrench for these screws.
- Push the pipetting head removal tool through the indicated hole. The pipetting head will be ejected slightly.
- Pull the pipetting head to the left to fully remove it. Pay attention to how the plastic slots on the old pipetting head match up to the metal prongs on the channel for the next step.
- Attach the new pipetting head. Match the two plastic slots on the pipetting head to the metal prongs on the channel, then slide the pipetting head onto the channel until it clicks in place.
- Secure the new pipetting head with the two red screws from step 1. Replacement pipetting heads come with extra screws if needed.
- Close the door when prompted. The Prep will begin calibrating the new pipetting head.
- When prompted, open the door and place tips on site 7. If your Prep has channels only, you will need two tips in positions A1 and B1. Otherwise, you will need a full column of tips in column A.
Specify which tips you loaded onscreen, then tap Next. - Close the door and wait until calibration is finished. You can remove the tips once calibration is finished.
Multi-Probe Head Replacement
- Loosen the indicated screw on the multi-probe head. Use the 3 mm hex wrench to loosen the screw by a half-turn.
- Grab the multi-probe head by the grip and pull to the left to remove it.
- Attach the new multi-probe head. Match the black prong on the multi-probe head to the hole on the channel, then slide the multi-probe head onto the channel until it clicks in place.
- Secure the new multi-probe head by re-tightening the screw from step 1.
- Close the door when prompted. The Prep will begin calibrating the new multi-probe head.
- When prompted, open the door and place tips on site 7. You will need a full column of tips in column A.
Specify which tips you loaded onscreen, then tap Next. - Close the door and wait until calibration is finished. You can remove the tips once calibration is finished.
Not finding answers? Reach out to us with questions.