How do I run daily/weekly/yearly maintenance?
To maintain best performance, the Microlab Prep requires regular maintenance. The routines for daily, weekly, and yearly maintenance are all accessed and run the same way. This article describes what you will need before starting maintenance and how to successfully complete each maintenance process.
Requirements
- Purchased from Hamilton:
- Silicone oil (yearly maintenance only)
- You will need to supply:
- Protective gloves (and any other appropriate PPE for your lab)
- Clean, lint-free, dry towels
- Deionized water
- Lint-free cotton swabs (yearly maintenance only)
Procedure
Though the procedures for daily, weekly, and yearly maintenance differ, all maintenance is accessed the same way. Refer to the appropriate section for steps specific to each kind of maintenance.
- Make sure to wear appropriate PPE for your lab.
- Turn on the Prep if it is not already on. Sign in if required.
- Tap the settings button with the gear icon at the top-right corner of the home page.
- Open the Maintenance tab and select Maintenance Routines.
- Select the required maintenance and tap Run.
-
Version 2.0 or newer
Daily Maintenance
- Open the door and inspect the tip eject sleeves and o-rings on the Prep’s pipetting tools. The tip eject sleeves should move up and down freely, and the stop discs should be undamaged and aligned with the tip eject sleeves.
If a stop disc is damaged, learn how to replace stop discs and o-rings. - Inspect the deck. Make sure the following components are secure and undamaged:
- Corner brackets
- Calibration post
- Waste block
- Liquid waste bottle
- Hamilton Heater Shaker, or the cover for the device connector
- Empty the waste bin and liquid waste bottle. Clean the waste bin and liquid waste bottle according to your laboratory’s procedures.
- Spray a clean, lint-free towel with deionized water and wipe down the pipetting tools' stop discs and tip eject sleeves. Lift the tip eject sleeves to expose the stop discs and o-rings.
- Close the door when prompted. The Prep will perform a brief calibration, after which maintenance is done.
Weekly Maintenance
Weekly maintenance only requires cleaning the deck. Specifically, the following components must be cleaned using a clean, lint-free cloth sprayed with deionized water:
- The deck area, including the corner brackets and base plates
- The waste block
- The calibration post in the center of the deck
Yearly Maintenance
The Prep includes an animation describing how to perform yearly maintenance. The tutorial animations are available in the Tutorials tab of the Prep’s settings page.
- Open the door, clear the deck, then close the door. The Prep will move the front channel or the 8-Probe Head into position for cleaning, depending on its configuration.
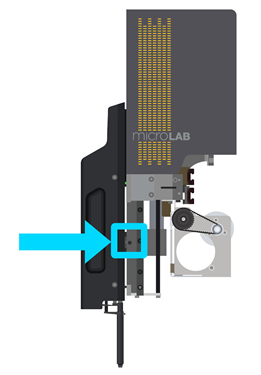
If your Prep has 2 Independent Channels, continue to step 2. If it does not have 2 Independent Channels, skip to step 6. - Open the door and clean the front channel’s lead screw with a clean, lint-free, dry cloth. The lead screw is located to the left of the tip eject sleeve. Wrap the cloth around the lead screw, then pull gently on each end to clean the lead screw.
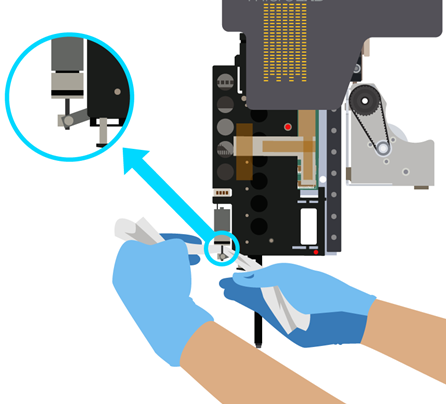
- Apply a small amount of silicone oil to the lead screw. Use a lint-free cotton swab to apply the oil. Do not apply more than a couple drops, as excess dripping oil could contaminate the Prep.
- Close the door when finished with the front channel. The Prep will position the rear channel for cleaning.
- Repeat steps 2–4 for the rear channel. Note that its lead screw is located to the right of the tip eject sleeve.
If your Prep has an 8 MPH, continue to step 6. If it does not have an 8 MPH, skip to step 8.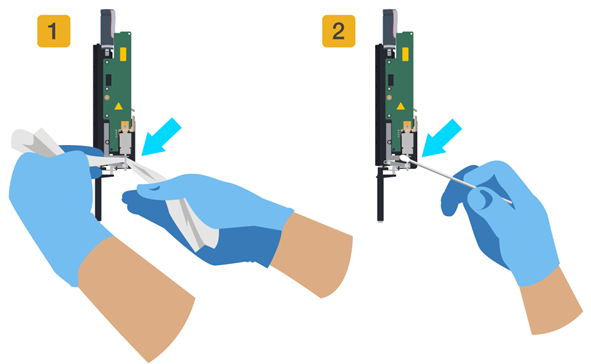
- Clean the 8 MPH’s lead screw with a clean, lint-free, dry cloth. The lead screw can be difficult to clean if your Prep also has channels; clean as much of the lead screw as possible.
- Apply a small amount of silicone oil to the lead screw. Use a lint-free cotton swab to apply the oil. Do not apply more than a couple drops, as excess dripping oil could contaminate the Prep.
- Close the door. The Prep will move the pipetting tools out of the way for the next step.
- Open the door and clean the following parts with a clean, lint-free, dry cloth:
- The pipetting arm’s lead screw
- Both pipetting arm rails
- The two rails at the back of the Prep
- Apply a small amount of silicone oil to the front, middle, and back of the pipetting arm’s lead screw. Use a lint-free cotton swab to apply the oil. Do not apply more than a couple drops, as excess dripping oil could contaminate the Prep.
- Close the door and tap Finish. The Prep will move the arm and pipetting tools to distribute the silicone oil.
- Open the door and inspect the tip eject sleeves and o-rings on the Prep’s pipetting tools. The tip eject sleeves should move up and down freely, and the stop discs should be undamaged and aligned with the tip eject sleeves.
-
Version 1.0
Daily Maintenance
- Open the door and inspect the tip eject sleeves and o-rings on the Prep’s pipetting tools. The tip eject sleeves should move up and down freely, and the stop discs should be undamaged and aligned with the tip eject sleeves.
If a stop disc is damaged, learn how to replace stop discs and o-rings. - Inspect the deck. Make sure the following components are secure and undamaged:
- Corner brackets
- Calibration post
- Waste block
- Liquid waste bottle
- Hamilton Heater Shaker, or the cover for the device connector
- Empty the waste bin and liquid waste bottle. Clean the waste bin and liquid waste bottle according to your laboratory’s procedures.
- Spray a clean, lint-free towel with deionized water and wipe down the pipetting tools' stop discs and tip eject sleeves. Lift the tip eject sleeves to expose the stop discs and o-rings.
- Close the door when prompted. The Prep will perform a brief calibration, after which maintenance is done.
Weekly Maintenance
Weekly maintenance only requires cleaning the deck. Specifically, the following components must be cleaned using a clean, lint-free cloth sprayed with deionized water:
- The deck area, including the corner brackets and base plates
- The waste block
- The calibration post in the center of the deck
Yearly Maintenance
The Prep includes an animation describing how to perform yearly maintenance. The tutorial animations are available in the Tutorials tab of the Prep’s settings page.
- Open the door, clear the deck, then close the door. The Prep will move the front channel or the 8-Probe Head into position for cleaning, depending on its configuration.
If your Prep has 2 Independent Channels, continue to step 2. If it does not have 2 Independent Channels, skip to step 6. - Open the door and clean the front channel’s lead screw with a clean, dry cloth. The lead screw is located to the left of the tip eject sleeve. Wrap the cloth around the lead screw, then pull gently on each end to clean the lead screw.
- Apply a small amount of the silicone oil included in the yearly maintenance kit to the lead screw. Use a lint-free cotton swab to apply the oil. Do not apply too much oil, as this could contaminate the Prep.
- Close the door when finished with the front channel. The Prep will position the rear channel for cleaning.
- Repeat steps 2–4 for the rear channel. Note that its lead screw is located to the right of the tip eject sleeve.
If your Prep has an 8 MPH, continue to step 6. If it does not have an 8 MPH, skip to step 10. - Open the door and remove the multi-probe head. Loosen the indicated screw by a half-turn, then grab the multi-probe head by the grip and pull it to the left to remove it.
- Clean the 8 MPH’s lead screw with a clean, dry cloth. The lead screw can be difficult to clean if your Prep also has channels; clean as much of the lead screw as possible.
- Apply a small amount of the silicone oil included in the yearly maintenance kit to the lead screw. Use a lint-free cotton swab to apply the oil. Do not apply too much oil, as this could contaminate the Prep.
- Reattach the multi-probe head when finished. Match the black prong on the multi-probe head to the plastic slot on the channel, then slide it in until it clicks in place. Tighten the screw from step 6 to secure the multi-probe head.
- Close the door. The Prep will move the pipetting tools out of the way for the next step.
- Open the door and clean the following parts with a clean, dry cloth:
- The pipetting arm’s lead screw
- Both pipetting arm rails
- The two rails at the back of the Prep
- Apply a small amount of silicone oil to the front, middle, and back of the pipetting arm’s lead screw. Use a lint-free cotton swab to apply the oil. Do not apply too much oil, as this could contaminate the Prep.
- Close the door and tap Finish. The Prep will move the arm and pipetting tools to distribute the silicone oil.
- Open the door and inspect the tip eject sleeves and o-rings on the Prep’s pipetting tools. The tip eject sleeves should move up and down freely, and the stop discs should be undamaged and aligned with the tip eject sleeves.
Not finding answers? Reach out to us with questions.