How do I replace legacy CO-RE stop discs and o-rings?
When one of the 2 Independent Channels or the 8-Probe Head reaches 20,000 tip eject cycles, the Microlab Prep will recommend replacing its stop disc(s) and o-ring(s). This article describes how to perform this maintenance routine.
Requirements
- Purchased from Hamilton:
- Set of stop discs (2-pack for channels, P/N 6603039-01; 8-pack for 8 MPH, P/N 6603039-02)
- Stop disc glue (Loctite 222 included with new stop discs—do not use different glue)
- Tips
- Stop disc removal tool P/N 6603034-01
- You will need to supply:
- Protective gloves (and other appropriate PPE for your lab
- Clean, lint-free towels
- Deionized water
Procedure
-
Version 2.0 or newer
The Prep includes an animation describing how to replace stop discs and o-rings. The tutorial animations are available in the Tutorials tab of the Prep’s settings page.
- Make sure to wear appropriate PPE for your lab.
- Turn on the Prep if it is not already on. Sign in if required.
- Tap the settings button with the gear icon at the top-right corner of the home page.
- Open the Instrument tab and select Maintenance.
- Select the required stop disc replacement routine. Each channel has its own routine, as well as the 8-channel MPH.
- Open the door, clear the deck, then close the door. The Prep will move the appropriate pipetting tool into position for replacing its stop disc(s) and o-ring(s).
- Use the stop disc removal tool to unscrew the old stop disc, along with its o-ring and washer. The tool has two small prongs that fit into notches on the stop disc; the tool can only twist one way to remove the stop disc.
- Apply glue to 2–3 threads on the new stop disc. Do not remove the stop disc from its rubber strip yet—if glue gets on the washer or o-ring or inside the stop disc, the stop disc will have to be replaced.
- Pull the new stop disc out of its rubber strip. Twisting the stop disc may help to remove it.
- Make sure the o-ring and washer are properly attached and aligned on the new stop disc. Inspect and ensure all eight stop disks on the multi-probe head are at the same height. The o-ring should rest between the top of the stop disc and the washer. Double-check that the washer and o-ring are glue-free before proceeding.
- Screw the new stop disc onto the pipetting head or multi-probe head by hand. The washer may need to be adjusted so it rests flat on the o-ring. Make sure the stop disc goes on straight to avoid cross-threading it on the pipetting head.
- Do not use any tools to tighten the stop disc, or you may damage the pipetting head and have to replace it.
- Clean the new stop disc with a clean, lint-free towel sprayed with deionized water.
- Repeat steps 7–12 as necessary. All eight stop-discs on the multi-probe head must be replaced. The front and rear pipetting head only have one stop disc each, but they should be replaced at the same time for consistent performance.
- Close the door when prompted. The Prep will start the calibration procedure for the new stop discs and o-rings.
- When prompted, open the door and place tips on site 7. If your Prep has channels only, you willl need two tips in positions A1 and B1. Otherwise, you will need a full column of tips in column A. Specify which tips you loaded onscreen, then tap Next.
- Close the door and wait until calibration is finished. You can remove the tips once calibration is finished.
-
Version 1.0
The Prep includes an animation describing how to replace stop discs and o-rings. The tutorial animations are available in the Tutorials tab of the Prep’s settings page.
- Make sure to wear appropriate PPE for your lab.
- Turn on the Prep if it is not already on. Sign in if required.
- Tap the settings button with the gear icon at the top-right corner of the home page.
- Open the Instrument tab and select Maintenance.
- Select the required stop disc replacement routine. Each channel has its own routine, as well as the 8 MPH.
- Open the door, clear the deck, then close the door. The Prep will move the appropriate pipetting tool into position for replacing its stop disc(s) and o-ring(s).
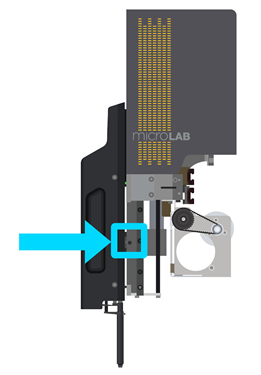
- If you are replacing stop discs for the 8 MPH, remove its multi-probe head. Loosen the indicated screw by a half-turn, then grab the multi-probe head by the grip and pull to the left to remove it.
- Use the stop disc removal tool to unscrew the old stop disc, along with its o-ring and washer. The tool has two small prongs that fit into notches on the stop disc; the tool can only twist one way to remove the stop disc.
- Apply glue to 2–3 threads on the new stop disc. Do not remove the stop disc from its rubber strip yet—if glue gets on the washer or o-ring or inside the stop disc, the stop disc will have to be replaced.
- Pull the new stop disc out of its rubber strip. Twisting the stop disc may help to remove it.
- Make sure the o-ring and washer are properly attached and aligned on the new stop disc. The o-ring should rest between the top of the stop disc and the washer. Double-check that the washer and o-ring are glue-free before proceeding.
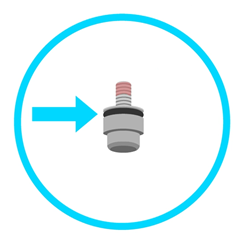
- Screw the new stop disc onto the pipetting head or multi-probe head by hand. The washer may need to be adjusted so it rests flat on the o-ring and slides over the end that the stop disc screws into. Do not use any tools to tighten the stop disc, or you may damage the pipetting head and have to replace it.
- Clean the new stop disc with a clean, lint-free towel sprayed with deionized water.
- Repeat steps 8–13 as necessary. All eight stop-discs on the multi-probe head must be replaced. The front and rear pipetting head only have one stop disc each, but they should be replaced at the same time for consistent performance between the two channels.
- Close the door when prompted. The Prep will begin calibration for the new stop discs and o-rings.
- When prompted, open the door and place tips on site 7. If your Prep has channels only, you will need two tips in positions A1 and B1. Otherwise, you will need a full column of tips in column A.
Specify which tips you loaded onscreen, then tap Next. - Close the door and wait until calibration is finished. You can remove the tips once calibration is finished.
Not finding answers? Reach out to us with questions.